-
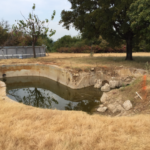
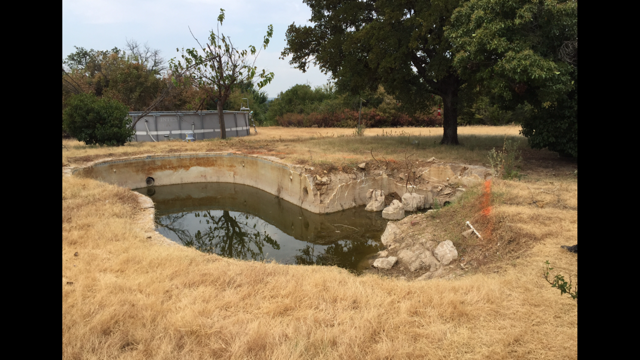
- Before
-
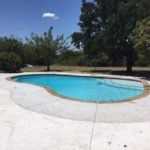
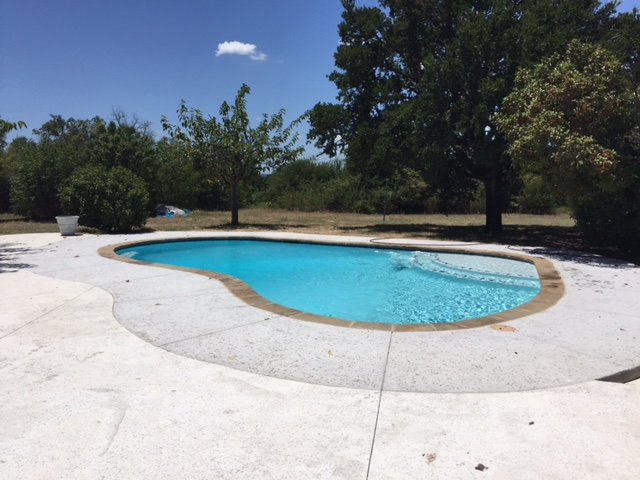
- After
Pool Remodeling in DFW
Whether you own a pool that is due for replastering or you want to update the style or add a hot tub, we can handle all of your remodeling needs. When you choose Davidson Custom Pool Plastering and Remodeling, you are choosing a family owned company, dedicated to delivering the highest standard of quality and service in the industry. We want to help you achieve your dream for your own backyard paradise.
Call us today to set up a complimentary consultation with one of our experts to get started on remodeling your existing pool into the oasis you dream about!
Swimming Pool Plaster Startup Do’s & Don’ts
The main objective in a pool startup is to clear or get rid of the plaster scale (dust), and to balance and stabilize the water chemistry in the pool as soon as possible. The first 30 days of plaster curing are the most critical. The need for proper water chemistry and maintenance continues for the life of the pool. The following are some of the “do’s and don’ts” for starting up a freshly plastered pool. Startup Do’s & Don’ts are designed to provide basic new plaster start up information. There are other start up techniques and procedures available. Please consult with your plasterer, service technician or other pool professional.
A. The Source Water
Before adding any water to the pool, make sure you know the quality of the water. This is recommended because water quality is not the same everywhere. You may find that your local water source is not suitable for filling a freshly plastered pool. It is recommended that all water chemistry readings be written down for future reference.
B. Determine the Water Gallonage Of Your Pool
You may want to take a meter reading if you are filling from one source with a water meter.
Square or Rectangle-LxWxAverage Depthx7.5
Round-Diameter x Diameter x Average Depth x 5.9
Oval-L x W x Average Depth x 5.9
Irregular shaped pools should be divided into the above geometric shapes and added together.
C. Filling The Pool
After the pool has been plastered, the plaster crew should leave a hose in the pool to fill with water(refer: Footnote in left scroll box). This hose should have a clean, soft cloth tied on the end of it to diffuse the water so that it does not whip, protects the pool surface from being marred by the end of the hose, and to catch any debris that may be in the water system. Do not add anything but potable water. Make sure the fill is not connected to a water softener.
- Fill Pool as fast as possible. Additional hoses will fill the pool faster. Make sure by a clean, soft cloth. If the pool fills too slowly, check cracks may appear on the step and near the tile line on the walls.
- Do not let hose whip or flail around the pool.
- Do not use fill lines on the wall or tile line.
- Put all hoses in the deep end of the pool.
- Do not let the hoses rest on the plaster, particularly across the length or width of the pool. They may leave a mark.
- It is okay to leave the protected end of the hose floating in the forming pool of water.
- Do not add anything to the pool until it has finished filling. This includes water clarifiers and chelating agents.
- Do not stop the water until the pool has completely filled. This is usually to the middle of the skimmer opening.
- If it looks as if the pool is going to finish filling while you are not around, turn down the volume of water to a lower rate, but do not turn the water off.
- If you turn the water off while you are filling, it will leave a water stain ring at that point on the plaster that could be permanent.
- If you splash, spill, wash onto or cause anything to fall onto the plaster, it may stain the plaster.
- Do not walk on the freshly plastered surface or allow pets or animals to walk on the fresh plaster.
D. Test the Water Again.
You may find that the water is substantially different after filling the pool than when first tested. Write the chemistry readings down. In order to satisfy water chemistry needs for calcium, water must contain a minimum of 150 ppm of calcium. Insufficient amounts of calcium in the fill water will force the water to draw calcium from the fresh plaster material, creating surface conditions which may not be able to be corrected.
E. Starting The Equipment.
- Make sure you start with a clean filter.
- Make sure that the circuit breakers are on and that the time clock is set for 12 hours or more.
- Prime the filter pump with water and start the pump. There will be air in the plumbing so make sure that all of the air has been purged from the system.
- If you have a diatomaceous earth filter it will require pre coating as per manufacturer’s directions.
- Write down the pressure reading from the gauge on top of the filter. Make sure this is the reading with a clean filter. This reading is important because when the filter pressure has risen 4-8 psi, it will be time to clean the filter again.
- If there is a main drain valve, open it all the way.
- Do not turn on the heater for a minimum of three weeks.
- Do not turn on waterfalls or fountains that aren’t necessary until the startup procedure has been completed.
- Do not swim in the pool until after the start up procedure has been completed.
- Do not use any automatic pool cleaners for a minimum of three weeks after plastering.
F: Adding Chemicals
Due to the varying differences in source water chemistry, it is up to the person who is doing the start up to evaluate the water conditions present. It must be perfectly clear that the person administering the chemicals should be aware of the power and effects of each chemical and the possible reactions of each chemical. It is the sole responsibility of that person to administer the chemicals in a calculated and safe manner.
G: Adding Stain Preventative And Water Clarifiers
These chemicals are extremely important. They help minimize normal staining. Do not add these chemicals until after the pool is filled.
- Follow manufacturer’s directions for dosage.
- Before pouring chemicals into the pool dilute mixture in a large pail. Always add chemical to water; never water to chemical.
- Apply diluted mixture around the pool away from the pool walls. Do not pour directly into one spot.
- Brush pool immediately.
- Adding water clarifiers and/or chelating agents in excessive proportions may lead to opposite effects.
- Chelating agents are broken down by UV light and should be replenished as part of normal maintenance.
- The mixing of water clarifiers and chelating agents together may cause unwanted results. Make sure chemicals are compatible.
H. Other Chemicals
1. Adding large doses of chlorine to water in one spot may cause mineral and metal fallout. This may cause staining of fresh plaster.
2. The addition of large doses of any chemical in any one spot may cause mineral and metal fallout resulting in stained plaster.
3. Addition of muriatic acid to pools during start up will reduce plaster scale(dust). Also, reduces the water’s alkalinity and lower the pH.
4. Failure to rid the pool of scale(dust) during the start up can lead to the hardening and sticking of this scale(dust) to the surface of the plaster.
5. The addition of excessive amounts of muriatic acid to plaster surfaces may cause it to etch.
6. Broadcasting any granular or powder chemical products onto the plaster surface may stain it, especially colored plaster.
7. Pre-dissolve all dry chemical products before introducing them into the pool.
8. Conditioner (cyanuric acid or stabilizer) should be introduced into the skimmer with the equipment running, and allowed to dissolve before turning off the equipment. This is generally about 24 hours. Add conditioner after all plaster residue has been removed.
I: Clearing the Scale(dust)
You may notice plaster scale (dust) on the bottom of the pool. This is normal and will go away with proper treatment and brushing. The main objective in starting a pool is to clear or get rid of scale(dust) and to balance water chemistry in the pool as quickly as possible.
1. Do not use a wheeled vacuum for three weeks after plastering. The use of a brush vac is recommended during the first three weeks to avoid marring the plaster.
2. On some pools you may have to turn off the main drain so that you can vacuum.
3. When you vacuumed the scale (dust) from the pool it is important to clean this residual from the filter right away. Remember to recharge the filter if it is a D.E. filter.
4. It is okay to vacuum the scale (dust) to waste if you wish.
5. The more you brush the pool the better it will look. The entire pool should be brushed preferably twice a day until the water is balanced and the plaster scale (dust) has gone away.
6. The pool should be brushed after each vacuuming.
7. The filter pump should be on with the main drain open.
8. Add chlorine in small amounts as needed to the pool until after the scale (dust) has been eliminated, the water is balanced and stabilized and conditioner added.
Davidson Custom Pool Plastering’s Color Plaster Disclaimer
Since pool plaster is composed of natural materials which have certain inherent characteristics, a certain amount of shading or color variation is a natural occurrence which should not be construed as a defect and which only enhances the natural beauty of your pool. Homeowners need to understand that the plaster is NOT guaranteed for evenness of color and may not be the exact shade anticipated. The shade and color may vary and fade over time. The plaster may become streaked, blotchy, or have a mottled appearance over which the contractor has no control. Homeowner should also understands that crazing(check cracks and hairline cracks) may be noticeable and may be quite pronounced with colored plaster.
Due to atmospheric conditions(humidity, temperature, etc.) during plastering, light and/or dark streaks(a marbleized look) may appear in the plaster and may be more pronounced on a cloudy day or at night with the light on. These conditions are beyond the contractor’s control.
Davidson Custom Pool Plastering’s Chemical Recommendations
- Chlorine: 1.5 to 3.0 ppm

- pH: 7.2 to 7.8
- Total Alkali: 80 to 120ppm
- Total Calcium: 200 to 450ppm
- Cyanuric Acid: 40 to 60ppm
•Total Dissolved Solids: Under 100ppm
For finishes other than white plaster, home owner needs to refer to manufacture’s specification.